In our article of 5 March 2015, we presented you the new Enhanced Ecommerce reports available for Google Analytics accounts that are migrated to Universal Analytics. Those reports provide key insights to understand the pre-purchase ecommerce behavior. In this article, you will learn how to implement the Enhanced Ecommerce tracking on your website. We will have a look at the new ecommerce library, how to enable the Enhanced Ecommerce reports in Google Analytics and finally how to implement the new plugin on the website to send the information to Google Analytics. The implementations via hardcoding and via the Google Tag Manager will both be discussed.
Enhanced Ecommerce library
First of all the Enhanced Ecommerce plug-in (ec.js) uses a different library than the Classic Ecommerce plug-in. Therefore it should not be used alongside the ecommerce (ecommerce.js) plug-in for the same property.
There are diferent implemenation options. If you have not implemented ecommerce tracking before, you can directly implement the Enhanced Ecommerce library. If you have currently ecommerce tracking enabled and you want to use the Enhanced Ecommerce tracking, there are two possibilities, you can either migrate an existing property to Enhanced Ecommerce or create a new property (not recommended).
We advise to always use a test property before migrating to the Enhanced Ecommerce plug-in (even if you want to migrate an existing property).
Note that transaction and item data collected using the previous ecommerce plug-in will remain available in the properties and profiles where the data were collected before.
How to enable Enhanced Ecommerce in Google Analytics?
As we mentioned already, to be able to use the Enhanced Ecommerce library the Google analytics web property must first be migrated to Universal Analytics.
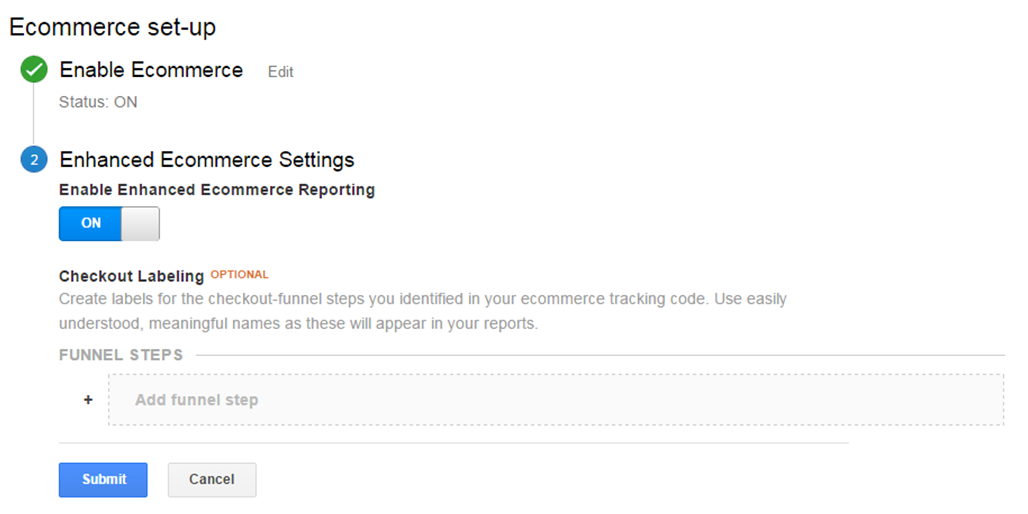
There are three simple steps to activate the Enhanced Ecommerce tracking in Google Analytics.
1. Enable Enhanced Ecommerce reporting
In the Admin section of your Google Analytics Accounts, select Ecommerce Settings in the view section. Switch on the Enhanced Ecommerce Settings button.

2. Add funnel steps by using the option checkout labeling
We recommend to use the most convenient names describing the options available in your checkout process. It allows you to define a funnel specific to your individual checkout process depending on your shipping, payment method selection options. If no name is chosen the different steps will show as step 1, step 2, step 3,…
3. The tracking code should be added to the website
Compared to traditional ecommerce tracking, there are more tracking codes to be implemented on the website. In the following part, we will go in more in details concerning how the tracking codes can be implemented on the website.
How to implement Enhanced Ecommerce tracking on the website and send this to GA?
The implementation of Enhanced Ecommerce tracking on the website is possible via the Google Tag Manager, via hardcoding on the website or via a plugin (for example Magento has an Enhanced Ecommerce plugin available). There are several types of data you can send with analytics.js:
- Impression Data: Represents information about a product that has been viewed.
- Product Data: Product data represents individual products that were viewed, added to the shopping cart, etc
- Promotion Data: Represents information about a promotion that has been viewed
- Action Data: Represents information about an ecommerce related action that has taken place.
- Product and Promotion Actions: Actions specify how to interpret product and promotion data that you send to Google Analytics.
Each type op data can be described by different values. For example the impressions contains the following values: the product ID/SKU, the product name, the product list, the brand, the product category, the product variant, the product position and the price.
Before begining the implementation, we recommend you clearly mapping of the data you want to track.
Implementation via hardcoding
1. Use the new ecommerce command to load the Enhanced Ecommerce plugin
![]()
2. Add the corresponding tracking code for the type of data you want to track
For example to measure the impression of a product in a list of search results, use the addImpression command:

3. The ecommerce data can only be sent with a hit (pageview, event). Consequently, you have to end your code with
![]()
4. Remove the old Universal Analytics transaction tag
Implementation via Google Tag Manager
- Update the Universal Analytics Track Pageview Tag to Enhanced Ecommerce

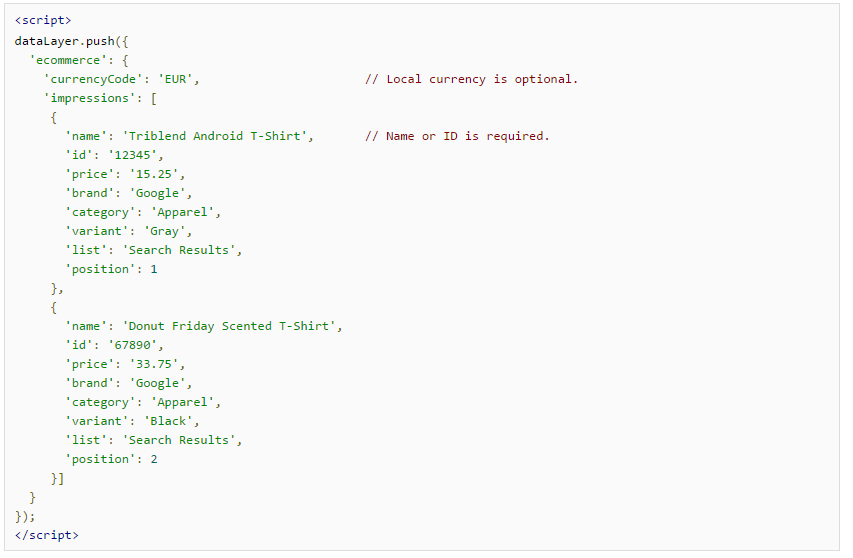
- Add the corresponding datalayer for the type of data you want to track
Such as in the previous example: to measure the impression of a product in a list of search results.

- Remove the old Universal Analytics transaction tag via the GTM
Conclusion
To conclude, as you have noticed, the implementation is a bit more complex than for the traditional e-commerce, as there are many more data to track. We strongly recommend to do the implementation via the Google Tag Manager, which can help saving time. As all data have to be sent to the datalayer, it becomes more manageable. However, it still needs the intervention of a developer.
To have a successful implementation of the Enhanced Ecommerce, you will need to have a deep thinking about what you want to track. Indeed, nothing is automatically tracked. The full implementation is dependent from what you have decided during the planning phase.
For more detailed information, visit: https://developers.google.com/analytics/devguides/collection/analyticsjs/enhanced-ecommerce
![]() written by Chloé Piérard
written by Chloé Piérard


