
We already explained in previous articles how to improve conversion tracking with Google Enhanced Conversions. In this article, we’ll explain how to implement it manually, using Google Tag Manager and a dataLayer variable.
Before you begin
Make sure you have Google Ads conversion tracking set up using Google Tag Manager.
- Know the conversion page URL where the conversion tag fires (e.g. the confirmation page URL) and the conversion event trigger (for example, a button click, a page view or an event).
- Make sure there is first party customer data available (email, full name and home address, and/or phone number) on the page where your conversion tracking tag fires.
- This implementation requires knowledge of how conversion tracking is set up on your website and some code changes, so make sure you are able to speak with the client’s development team as needed.
- Ensure that you’ve reviewed the customer data policies and agree to the enhanced conversion terms of service and policies in Google Ads.
Enable Enhanced Conversions in Google Ads
1) First, go to the conversion settings of your Google Ads Account
Tools and settings > Measurement > Conversions.
2) Then, select your main Purchase tag and open it

3) You will find below it the “Enhanced Conversions” section where you will have to toggle on “Turn on enhanced conversions”
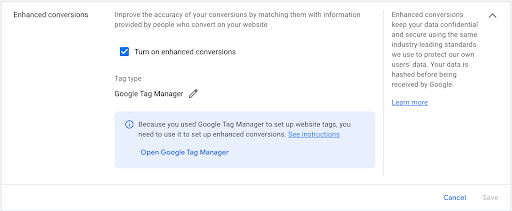
4) You will be asked to select either the Global site tag or Google Tag Manager, or API. Select the first option
5) You will have to check the URL of your website to make sure the tag is correctly setup on the website
6) This is done!
Setup Enhanced Conversions manually using Google Tag Manager
Now that you have enabled Enhanced Conversions in Google Ads, you will have to adapt your Google Ads conversion tag in GTM. Know that you sometimes have to wait up to 5 days to be able to properly adapt it.
There are several ways of implementing Enhanced Conversions:
- Using Automatic collection (if available)
- “Manual Configuration” with CSS Selectors or existing data layer variables
- Using the “Code” method to send all data in a single data object
In this article, we will tackle point n°2.
Follow the following steps:
1) First, go to your GTM container and select your Google Ads conversion tag
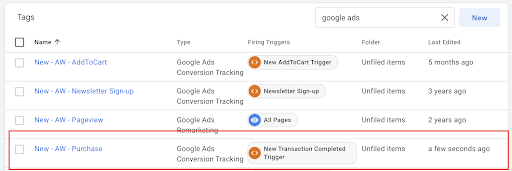
2) Make sure this is the correct tag. Conversion ID and Conversions Label should match between Google Ads and GTM
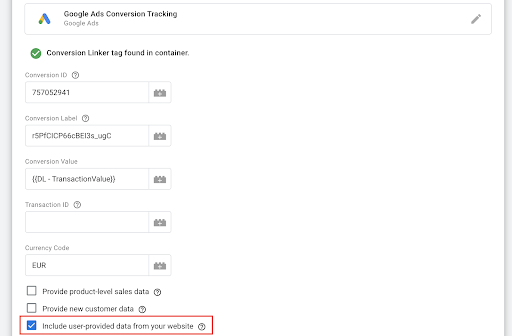
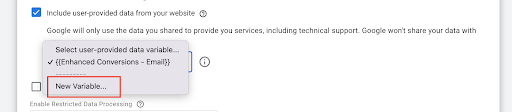
3) Within this tag, you should see the option “Include user-provided data from your website”. This is when magic happens and you can include the user data you want (for example: email address) so that Google can first hash it and then send it to Google Ads. Select this option
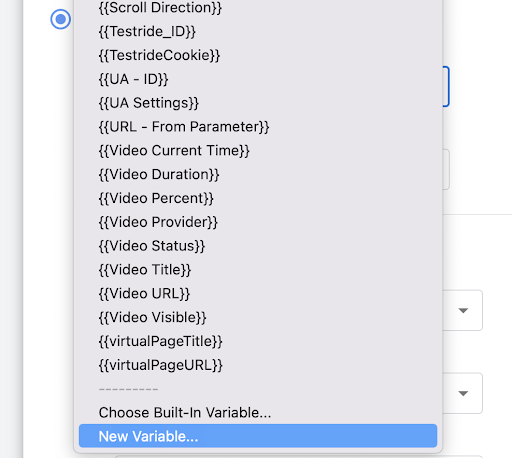
4) Click the “Select user-provided data variable” dropdown, and then click New Variable.
5) Select Manual configuration
6) For all the relevant user data fields that you would like to provide via enhanced conversion, click on the dropdown menu and select New Variable
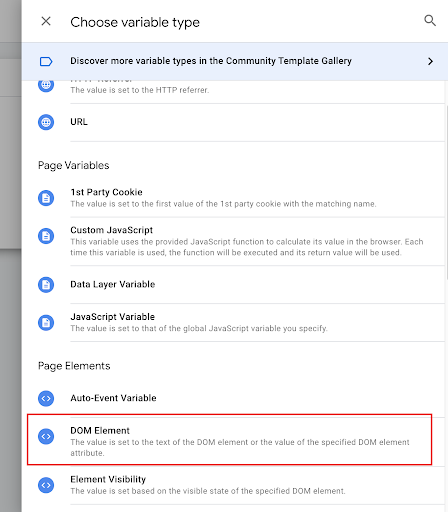
Note: If you already have unhashed user-provided data variables in your data layer (whether using CSS selectors or other variable types), you can select those instead of creating new variables. If you aren’t sure, continue through the instructions. You can choose between selecting DOM Element or Data Layer Variable.
By selecting Data Layer Variable
- You can ask the developers to push this piece of code in the data layer:
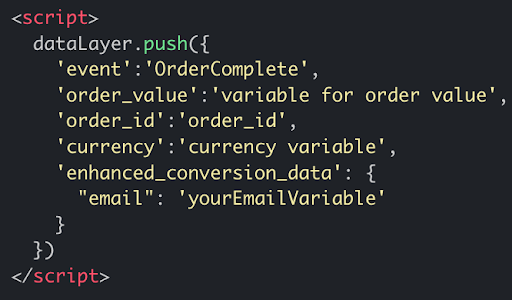
! Make sure to adapt the values ‘OrderComplete’, ‘order_value’, ‘order_id’ with the right naming that you use.
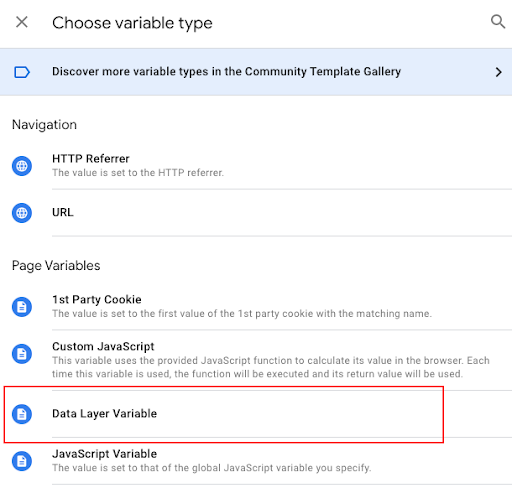
- In the “Variable Configuration” screen, select Choose a variable type to begin setup. In the “Choose Variable Type” screen, select Data Layer Variable.
- Back on the “Variable Configuration” screen, if you used the piece of code mentioned above, this is what you should have as a Data Layer Variable Name:
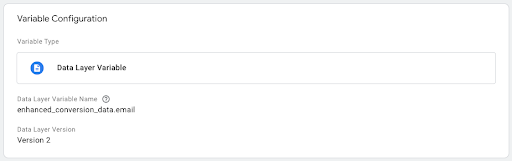
! If you put just “email” it won’t work. You need to put “enhanced_conversion_data.email”.
Give your variable a title and voilà! Everything should be properly set up.
How to debug your setup
In this article we explain how to verify your Google Enhanced Conversions implementation in Google Ads and using the Tag Assistant.

Justine Cremer
| LinkedinThis email address is being protected from spambots. You need JavaScript enabled to view it.
